How Do You Pick Up And Knit

I remember the first time I ever saw knitting. My Nana was sitting in her usual armchair, a soft wool blanket draped over her lap, her needles clicking away like a miniature, rhythmic orchestra. I was maybe seven, and I was mesmerized. It looked like pure magic. How did she take a string, a boring old string, and turn it into… well, anything? A scarf, a mitten, even a lopsided little toy elephant? It was baffling. I remember poking one of her yarn balls, convinced it was hiding a secret. Nana just smiled, her needles never missing a beat, and said, "It's just loops, darling. Lots and lots of loops." Lots and lots of loops. Right. That explained it. (Spoiler alert: it didn't.)
For years, knitting remained this mysterious, slightly intimidating craft. It felt like something reserved for grandmas and people with an abundance of free time and a patience I hadn't quite developed yet. But then, a few years ago, I found myself staring down the barrel of a particularly brutal winter. My existing scarf collection was looking… sad. And I'd developed this sudden, overwhelming urge to make something. Something tangible. Something warm.
So, I did what any self-respecting internet-era human would do: I Googled. "How to knit for beginners." And let me tell you, the internet is a glorious, chaotic mess of information. Tutorials, patterns, forums… it's enough to make your head spin faster than a dropped stitch. But somewhere in the digital ether, I found a video that changed everything. It wasn't super professional, the lighting was a bit dodgy, but the woman explaining it was so calm, so encouraging. And she broke down the magic into… well, into loops. Actual, understandable loops.
This is where we are today. You, my friend, are probably in a similar boat. You’ve seen the knitted wonders, you’ve felt the cozy pull of handmade warmth, and you’re thinking, "Okay, maybe I can do this." And the answer is a resounding YES! You absolutely can. Forget the intimidation. Forget the fear of dropped stitches and tangled yarn (we'll get there). Today, we're going to tackle the absolute basics of picking up and knitting. Think of this as your friendly, slightly rambling introduction to the wonderful world of creating with yarn.
So, You Want to Knit? Let's Get Started!
Before we even think about holding needles, we need some supplies. Don't go overboard! The key here is to start simple. You wouldn't buy a whole Michelin-star kitchen for your first attempt at boiling an egg, right? So, let's keep it manageable.
The Essential Tools of the Trade
1. Yarn: This is the fun part! For beginners, I highly recommend a smooth, medium-weight yarn. Think worsted weight or aran weight. Why? Because it's easy to see your stitches, it's forgiving, and it won't feel like wrestling a woolly octopus. Acrylic yarn is a fantastic, affordable choice for practicing. It’s durable, washable, and comes in a rainbow of colors. Avoid anything too fuzzy, too dark, or too thin for your first few projects. You want to be able to see what you're doing!
2. Knitting Needles: This is where things can get a little technical, but don't panic. For our medium-weight yarn, a pair of US size 7 or 8 (that's 4.5mm or 5mm in metric) needles is a good starting point. You can get straight needles (the most common type) or circular needles (which are joined by a cable). For learning basic stitches, straight needles are perfectly fine. Again, avoid anything too tiny or too massive for now. You can find decent beginner needles at craft stores or online. They don't need to be fancy!
3. A Pair of Scissors: Obvious, I know. But you'll need them to cut your yarn. Keep them handy!
4. A Tapestry Needle (or Yarn Needle): This is a blunt-tipped needle with a large eye, perfect for weaving in those pesky yarn ends when you're done. Trust me, you'll appreciate this later!
Once you've got your basic kit, you're already halfway there. Seriously. The hardest part is often taking that first step. Now, let's talk about the very first stitch: the slip knot.
The Very First Loop: The Slip Knot
Every knitting project, without exception, starts with a slip knot. It's the gateway drug to knitting, if you will. It’s how you get your yarn onto your needle to create your first row of stitches.
Let’s break it down. Imagine your yarn is a lazy snake. You want to make a loop with it.
Here’s how:
Take the end of your yarn (the tail) and make a loop. Imagine you’re drawing a circle. One end of the yarn should be sticking out longer than the other. Now, take that longer end and bring it under the loop you just made. Think of it as tucking the snake’s head back into its own body.
You should now have a smaller loop attached to your longer tail. Grab that smaller loop, and pull on the longer tail to tighten it. Congratulations! You’ve just made a slip knot. It’s essentially a loop that can be easily tightened or loosened.
Now, take one of your knitting needles and thread it through that slip knot. Gently pull on the yarn tail to snug the knot up onto the needle. Not too tight, not too loose. Just a comfortable fit, like a well-worn glove. This is your first "stitch" on the needle. Exciting, right? This is the foundation upon which all your knitting dreams will be built.
Casting On: Building Your Foundation
Now that you have your slip knot on your needle, it’s time to create the first row of stitches. This is called "casting on." There are a few different methods for casting on, but for beginners, the "long-tail cast on" is the most common and versatile. It creates a nice, stretchy edge.
This one can feel a little fiddly at first. You’re going to be using both hands and the yarn in a bit of a dance. Don't worry if your first few attempts look… lumpy. Mine certainly did. It takes a bit of practice for your hands to remember the movements.
The Long-Tail Cast On:
First, you need to estimate how much yarn you’ll need for your tail. This is the trickiest part for beginners. A general rule of thumb is to wrap the yarn around your needle about 10 times for every 20 stitches you want to cast on. For your first practice swatch, let’s aim for about 20 stitches. So, wrap your yarn around the needle about 10 times. Then, hold the yarn at the tip of the needle with your thumb and forefinger of your non-dominant hand.
Let the yarn hang down from your needle. You’ll have a loop around your thumb and the working yarn (the one attached to the ball) draped over your forefinger. Your needle is now positioned between these two strands of yarn.
Here's the motion: Dip your needle under the strand on your thumb, then bring it over the strand on your forefinger. Pull the forefinger strand through the loop on your thumb. Then, drop the loop off your thumb and gently pull the working yarn to create a new stitch on your needle. Voila! Your first cast-on stitch. See? Magic, but with a little practice, it’s achievable magic.
You repeat this process, always creating a loop with your thumb and then knitting that loop onto the needle, until you have the desired number of stitches. Aim for about 15-20 stitches for your first practice swatch. It’s not about perfection, it’s about getting the rhythm. Don't get discouraged if it looks messy. Everyone’s first cast-on looks a bit wonky. Just keep going.
The Knit Stitch: The Building Block of Everything
Okay, you’ve got your stitches on the needle. Now for the main event: the knit stitch! This is the fundamental stitch that forms the base of most knitted fabrics. Once you master this, you’ve unlocked a huge portion of the knitting universe.
Imagine your needle with the cast-on stitches as your left hand, holding the "work." Your empty needle is your right hand, ready to create new stitches.
The Knit Stitch (English Style):
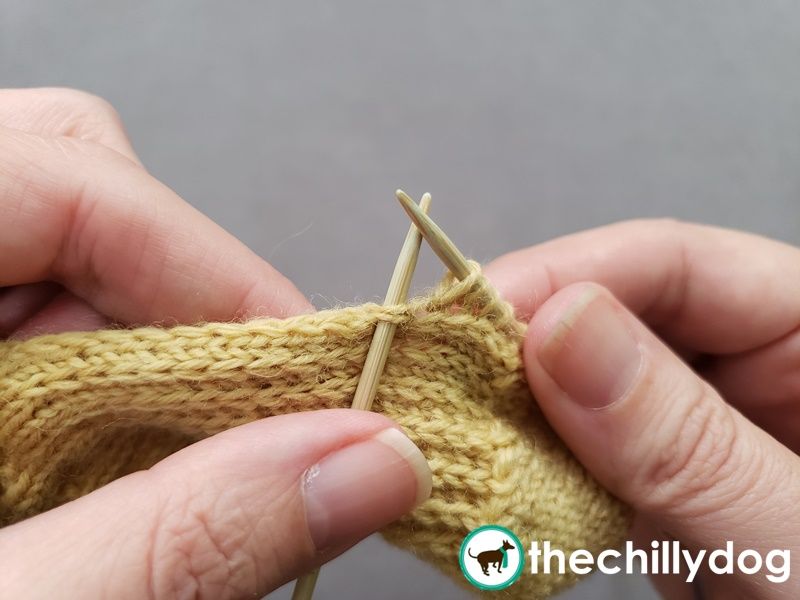
1. Insert the Needle: Take your empty right needle and insert it into the first stitch on your left needle, from front to back. Think of it like you’re giving the stitch a little hug with the right needle.
2. Wrap the Yarn: Now, take your working yarn (the one attached to the ball) and wrap it around the tip of your right needle, counter-clockwise. Imagine you're guiding the yarn around the needle.
3. Pull Through the Loop: This is the crucial step. Using the tip of your right needle, carefully pull the wrapped yarn through the stitch on the left needle. You're essentially creating a new loop and pulling it out of the old one.
4. Slide Off the Old Stitch: Once the new loop is on your right needle, gently slide the original stitch off the tip of your left needle. Don't yank it! Just a gentle nudge.
And there you have it! You've just made your first knit stitch. You should now have one stitch on your right needle and one less on your left. You just transferred a stitch from one needle to the other.
You repeat this process for every stitch on your left needle. Insert the right needle, wrap the yarn, pull the loop through, slide off the old stitch. Do this all the way across. When you've finished all the stitches on your left needle, your right needle will be full, and your left needle will be empty. You've completed your first row!
Now, here's where it gets really cool. To start your second row, you simply switch the needles. The needle with all the stitches becomes your left needle again, and your empty needle becomes your right needle. You then repeat the exact same knit stitch process all the way across.
Keep knitting, row after row. You'll start to see a fabric forming. It will look a bit like a series of bumpy waves. This is called "stockinette stitch," and it's the most basic knitted fabric. It's the building block for sweaters, blankets, and a million other things. It is the language of knitting.
The Purl Stitch: The Other Half of the Story
While you can make a lot of things with just the knit stitch (like garter stitch, which is just knitting every row), to create more interesting textures and patterns, you need to learn the purl stitch. Think of the knit stitch and the purl stitch as two sides of the same coin. They are opposites, and together they unlock a world of possibilities.
The purl stitch looks different from the knit stitch. Instead of a flat ‘v’, it creates a little bump or ‘knot’ on the surface of the fabric.
The Purl Stitch (English Style):
The setup is slightly different, and it’s all about the yarn's position.
1. Bring Yarn to the Front: Before you insert your needle, make sure your working yarn is in front of your work (between you and the needles). This is the opposite of where it is for a knit stitch.
2. Insert the Needle: Now, insert your right needle into the first stitch on your left needle, but this time, go from back to front. Think of it as reaching behind the stitch.
3. Wrap the Yarn: Wrap your working yarn around the tip of your right needle, this time clockwise. It’s like you're wrapping it in the opposite direction compared to the knit stitch.
4. Push Through the Loop: Using the tip of your right needle, carefully push the wrapped yarn through the stitch from back to front. You're creating a new loop that will sit on your right needle.
5. Slide Off the Old Stitch: Gently slide the original stitch off the tip of your left needle. You've just made a purl stitch!
Again, repeat this process for every stitch on your left needle. When you’ve finished a row of purl stitches, you’ll notice the fabric looks different. It's got a bumpy texture.
Putting It All Together: Your First Swatch
So, here’s your mission, should you choose to accept it (and you should!).
Cast on about 15-20 stitches using the long-tail cast on.
Option 1: Garter Stitch (Super Simple!)
Knit every single stitch on every single row. That's it. You’ll end up with a fabric that looks the same on both sides and has a lovely wavy texture. This is great for scarves and dishcloths!
Option 2: Stockinette Stitch (The Classic Look)
Row 1: Knit every stitch.
Row 2: Purl every stitch.
Repeat Row 1 and Row 2. You'll see a smooth side (the knit side) and a bumpy side (the purl side). This is what most sweaters and hats are made of.
Work on your swatch for a few inches. Don't worry about making it a perfect rectangle. The goal is to get comfortable with holding the needles, managing the yarn, and executing the knit and purl stitches. You're building muscle memory. Your hands will start to remember what to do.
And when you're done with your swatch, you'll need to know how to take your stitches off the needle. This is called "binding off" or "casting off."
Binding Off: Finishing Your Work
This is how you secure your stitches so they don't unravel. It's the polite way to say goodbye to your knitting.
The Basic Bind Off:
1. Knit the first two stitches of your row as usual.
2. Pass the first stitch over the second. Use the tip of your left needle to lift the first stitch (the one on the far right of your right needle) up and over the second stitch, and off the tip of the right needle. You've just bound off one stitch!
3. Knit the next stitch on your left needle. You now have two stitches on your right needle again.
4. Repeat step 2: Pass the first stitch over the second again.
Continue this process: knit one stitch, pass the previous stitch over. When you get to the very last stitch, cut your yarn, leaving a tail of about six inches. Pull that tail through the last loop on your needle. And that’s it! Your knitting is secure. Cut the yarn and admire your handiwork.
You've done it! You've picked up needles, cast on, knit, purled, and bound off. It might not be a masterpiece yet, but it's proof that you can knit. You've started a journey, and the possibilities are endless. From here, you can learn new stitches, read patterns, and make incredible things. Just remember Nana's words: it's just loops. Lots and lots of loops. And now you know how to make them.